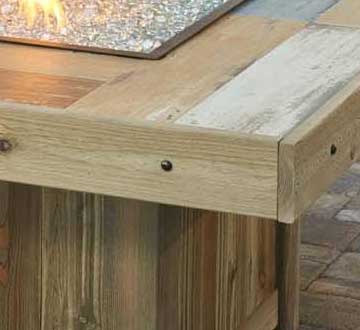
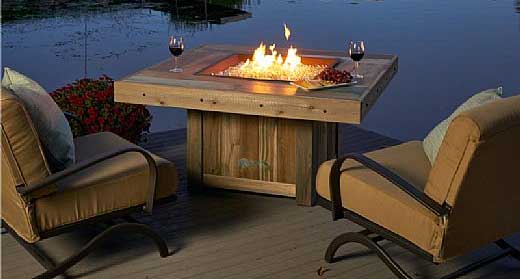
If you like unique, handmade-looking patio furniture, I think you’ll like this vintage rustic fire pit table. In fact, no 2 units look the same due to the distressed cedar wood base that discolors as it ages. Even the wood grain is different!
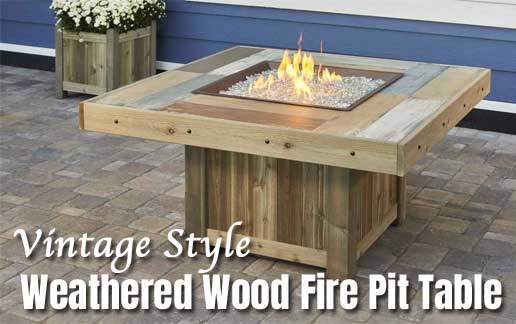
The tabletop continues this vintage look, but with mis-matched colored faux wood tiles. They won’t catch on fire, yet they have that casual rustic wood feel.
 Whether you live in a cabin or want to feel like you do, this weathered-wood style fire pit table really creates that country feel. Even the stainless steel fire bowl has a brown tint to it.
Having said all that, this heavy-duty outdoor furnishing is built to last in all sorts of weather.
Plus, you don’t need to continually clean it because it’s designed to look weathered and worn, right?
Note: If you want to keep the look of the distressed cedar planks from aging and changing color, simply apply a sealant. You can do this 1-2 years from the time you purchase the table to maintain the look of the cedar.
This Vintage Fire Pit Table Gives Off a LOT of Heat:
I couldn’t overlook the fact that this table has a 90,000 BTU heat output. In other words, your guests will get plenty of heat.
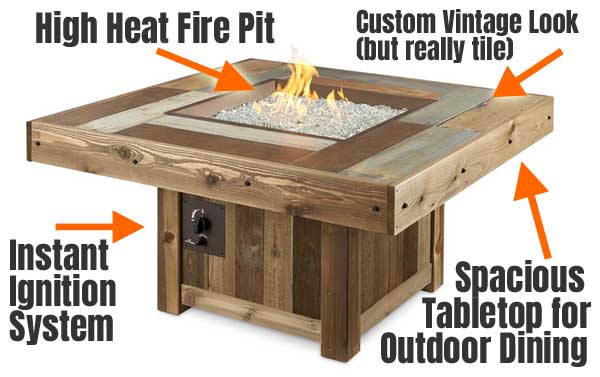
For instance, most fire pit tables of this size have a 40,000 BTU max, meaning they can only put out about half as much heat. If you like a warm fire, this fire pit provides a good option.
However, keep in mind that the more heat you use, the faster you can drain your propane tank. This can make operating your unit more expensive.
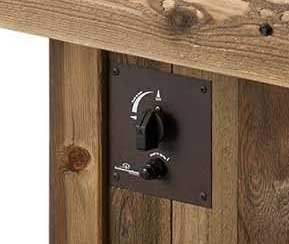
My easy solution to this issue (and to cut costs and save money) is to adjust the flame knob to low when I don’t need as much warmth. You can still enjoy the flame effect even when flames are low.
Basically, the higher heat capacity gives you more options and lets you entertain outdoors more often. Maybe even year-round!
Where to Put the Propane Tank:
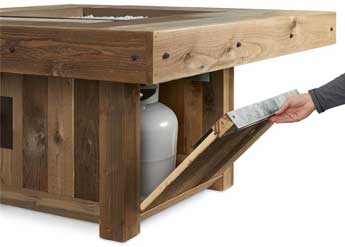 As with many gas fire pit tables, this vintage-style model features a built-in compartment underneath the fire bowl that cleverly conceals a 20-lb propane tank.
This self-contained system allows you to move your fire pit virtually anywhere in your backyard without having to be tethered to a gas line. In addition, the compartment keeps the power source conveniently out of the way. Not to mention, out of sight.
The pull-down door makes it really easy to access the tank whenever you need to change it. It literally takes under 1 minute.
Outland Living Rustic Fire Pit Table Specs:
- Dimensions: 48.25″ Square x 25″ Tall
- Weight: 240 lbs
- Material: Tile Tabletop, Cedar Wood Base
- Heat Output: 90,000 BTU’s
- Electronic Ignition
- Includes Grey Glass Burner Cover & Diamond-Colored Fire Glass
- Does Not Include Propane Tank
- Model #: VNG-2424BRN
- Assembly Required
- Can Be Configured for Natural Gas
- Made in the USA
- Manufacturer: Outdoor Greatroom Company, Phone: 1.866.303.4028
- Get the Vintage Fire Pit Table Here
How to Assemble this Vintage Fire Pit Table:
Outdoor Greatroom makes this fire pit table easy to assemble. In fact, you only need a utility knife to open the packaging and a wrench to tighten the gas lines.
Note: The table does weigh 240 lbs, so ideally you want to put it together at the location where you’ll end up using it. Or, have a friend help you move it.
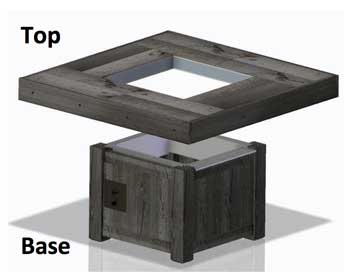
1. Attach Fire Pit Table Parts
First, the assembly process involves setting the tabletop on the base and attaching the side access door. These pieces are heavy, so count on getting that friend help you with this project.
2. Connect the Gas Lines
Second, connect the gas supply lines in the table to either a 20-lb propane tank or natural gas. The instruction manual has helpful diagrams that explain exactly how to do this if you have questions.
3. Add Fire Glass
Third, set the burner tray into the center of the table and add the included fire glass beads. The table package comes with clear glass as to not detract from the rustic table coloring. That said, you can opt to add colored glass in the shade of your choice.
Fire glass comes in variety of different colors, and you’ll need about 20 lbs (or two 10 lb bags) to fill the fire bowl. (This table comes with 16 lbs of glass beads.)
4. Install the Battery
And last, input a AAA battery behind the spark ignition button on the side of the table. This simply involves unscrewing the knob and pushing the battery into place.
When you start up your fire pit, you’ll push this button while simultaneously turning the knob above it. This sparks the outcoming gas, enabling you to instantly and effortlessly light your fire.